+++*

Symbolic Forest

A homage to loading screens.

Blog : Post Category : Geekery : Page 1

The space between the lines

Pondering on what scale, exactly, to build the model railway

A week or so ago, I wrote about the train set I’d recently bought, as the nucleus of a model railway inspired by the Brecon & Merthyr line in South Wales. The train set is N Gauge, or N Scale. Is this, though, the best scale for me to build it in?

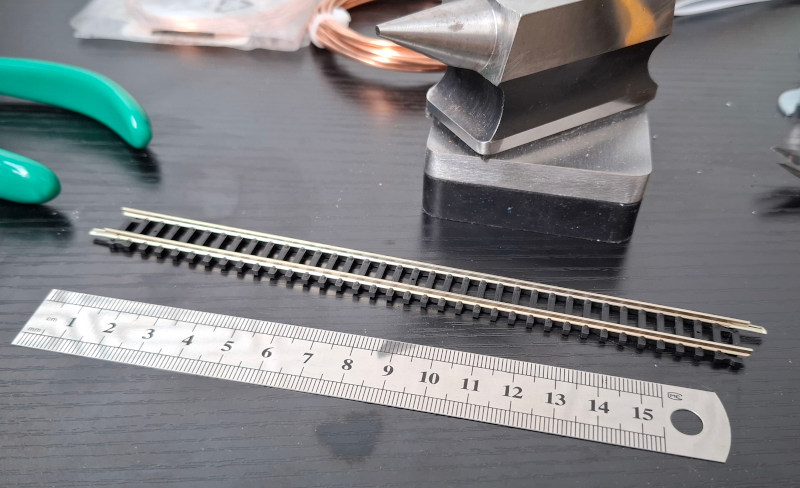
The term “gauge” means the distance between the inside edges of the rails, just as it does on a normal train. Model trains come in a huge variety of scales and gauges, ranging from those large enough to sit on, to those barely large enough to see. N Gauge was created by the Bavarian toy company K. Arnold in the early 1960s, and is named for the fact its gauge is nine millimetres—or neun Millimeter, I suppose. If I put a piece of the track that came with the train set next to a ruler, you can get a rough idea of its size.

A piece of model train track on a black workbench, next to a 15cm steel ruler.  You can see, by comparing the ruler and the track, that the track gauge is around nine millimetres.  The track is quite chunky, with thick rails and sleepers.

Because it’s so small, you can fit more train into a tight space; that’s always been one of the reasons I’ve struggled to build myself a model railway.

Lots of trains are made in N Gauge, off the shelf; and train sets, like the one I bought, to give you an easy start. However, it’s not the only gauge or scale that’s roughly this sort of size. The other one, in fact, is even older.

N Gauge’s scale, for British models, is 1 to 148; or a fraction over 2mm of model to every real-world foot. However, since the 1930s, modellers had already been handbuilding models to exactly 2mm to the foot. It’s an extremely similar scale, roughly 1 to 152. Given the trains are so small to begin with, the difference is barely even visible. One pioneering 2mm Scale model railway built in the 1940s, the Inversnecky & Drambuie Railway, has survived and is partially on display in the National Railway Museum in York.

Unlike N Gauge, you can’t buy any trains or train sets in 2mm Scale. There is, however, a 2mm Scale Association who produce various different products to help modellers build their own 2mm Scale trains. A while ago now, I bought one of their “starter packs”, which includes a short length of track, which you assemble yourself from rails and a plastic base. It’s much more fragile than train set track, so I glued it down to a piece of foamboard and tried to make it look ballasted.

A piece of model train track, stuck down to a small piece of painted foamboard, on the same workbench as the last picture and next to the same ruler.  You can see that the track gauge is roughly the same, but the rails are much smaller and thinner, and the sleepers are spaced more widely apart.

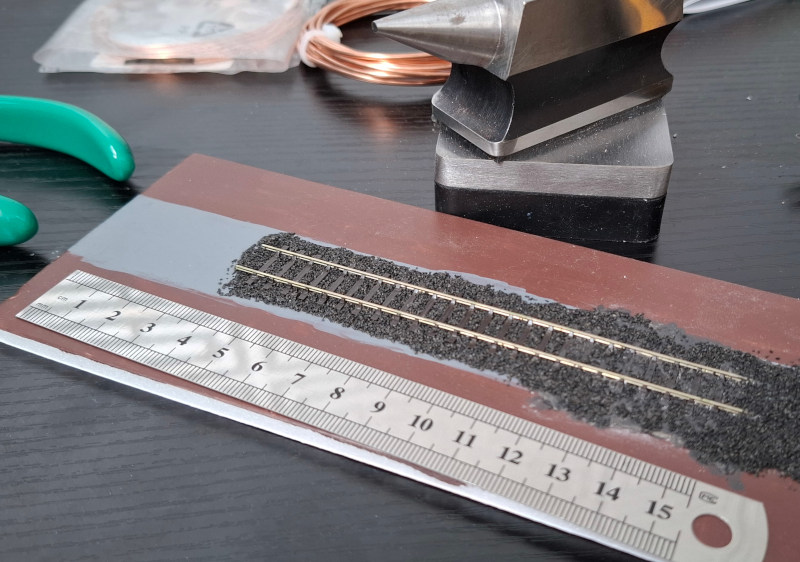
The track gauge isn’t 9mm, though; it’s 9.42mm instead. Very very close, but not close enough to run the same trains reliably. You can see it has much thinner rails; that’s because it tries to be an exact scale model of real track. For most of the twentieth century, most British railway line was made of individual 60-foot panels; so this piece of track is 12cm long as a result. 9.42mm is the exact width of real track, scaled down to 2mm scale; N Gauge, on the other hand, if you scaled it up to real life, would be about 10cm too narrow.

The question, then, is: which way should I go with this model? Go with N Gauge and trains I can just buy; or 2mm Scale and have to build an awful lot of stuff on my own. With the trains, at least, it’s possible to get N Gauge trains and just give them 2mm wheels; because as I said, they’re so close in size that few people can tell the difference. It might be an awkward, fiddly job though.

At the moment, I’m just not sure. Before things go much further, I’ll have to make a decision, and choose to go one way or the other. At least for now.

The impermanent way

In which we build a train set on the dining table

A few weeks ago, I posted about how I’d finally made the decision to start building a model railway, because perfection is the enemy of the possible or something along those lines.

A few days later, a box arrived.

A big cardboard box, sitting on the carpet

No, I don’t know why they sent such a big box, because the contents were much, much smaller.

If you want to model the Brecon & Merthyr Railway in the 1950s, Great Western pannier tank locos were extremely common. Conveniently, at the moment, you can easily buy an N Gauge train set containing a Great Western pannier tank, a couple of wagons, and a brake van to go on the back. Buying a set, with an oval of track and a power unit, means you bootstrap yourself: you can get everything you need to run one train in one box, even if all you can do is send one single train round and round in a circle. I’ll do a post explaining what “N Gauge” means at some point.

A tiny model of a Great Western Railway steam engine, pulling some wagons, on top of a dining table

Some people might point out that the loco is in 1945-47 condition, but the wagons are in pre-1937 condition; lots of wagons never got repainted though, so really they just need to look a bit dirtier and worn-looking than they are. You might notice I’ve also bought myself a few more wagons, the well known “BR 16 ton” type. Over 200,000 of them were built in the 1950s, and they were ubiquitous on the railways from the mid-50s through to the early 1980s. The ones I bought come in pre-rusted condition from the factory, so they’re really more like a wagon of the 1970s, after the B&M had closed; but, regardless, they’re still appropriate for the train.

Ever since I was small, also, I’ve read model railway advice that says “never run your train set on the carpet! There’s too much fluff!” So, this is on our dining table, which is also nice and friendly on my knees. I deserve comfort, you know.

Naturally, I wasn’t satisfied with just a single circle of track. It wasn’t long before another box arrived.

Pieces of model train track, in packaging, inside a freshly-opened cardboard box with brown paper padding

The track is a different brand to the train set, but it’s all the same track gauge, and also, all the track is the same shape: the curves are the same radius, the straight bits are all the same length. You’d think it would all just slot together, wouldn’t you?

Well, it didn’t.

Although the track was all compatible on paper, the “rail joiners” on the train set track were bigger and chunkier than the ones on the extra track. The extra track didn’t have enough clearance, between the rails and the plastic base, for the joiner on the train set track to slide on.

If this was a proper model railway and all of the track was fastened down, I wouldn’t care about this. I’d just pull all the joiners off and replace them with thinner ones. Because this is still just a train set, which has to be taken apart again whenever we want to stop playing trains and play a board game instead, that wasn’t really an option. Option two was to replace all the joiners anyway, and just hope that the new joiners stay in place. It would have done the job, but it also sounded like a lot of effort. Option three: buy more track. The original oval of train set track went in the spares box, and I just bought myself an oval from the other brand instead.

With that done, though, we had something you could imagine was a little station. It’s not much station and you need a lot of imagination, but nonetheless, you can shunt your train about!

A model railway on a table, with a loop and a siding.  The train is passing through the loop, and there are a few wagons in the siding

(This is a still from a video, so it’s a slightly blurry photo. Never mind that)

Where do we go from here? Well, there’s a few more things a full railway will need. More than one train, for one thing. I’ll post about that soon. For now though: there’s something extremely fun and simple about just being able to run your train round in a circle on the dining table, without really worrying about accuracy, authenticity, and anything else. Until we do need the dining table for something else.

Theory and practice

In which Cait once more attempts something she's always wanted

Occasionally, over the past few years, I’ve mentioned how I’d like a model railway, but there are just too many interesting railways to choose from. In fact, I’ve always wanted a model railway. My father also always wanted a model railway, but never quite managed to do anything about it either.

This has led me to an interesting place in life. I’ve always had many, many plans for different model railways. I’ve tried to start building them, and I’ve never got very far, but the research I’ve done has been immense. On the actual railway history side, I know my stuff. I know my Bristol & Exeter from my Bristol & Gloucester. I know my Midland from my Great Northern from my Midland & Great Northern. I know why the Great Western Railway had LNER-style signals, and I know where the LNER ran in North Wales and why. On the modelling side, I know my theory too. I know why cassettes are better than traversers, and the difference between EM and P4. I know who Edward Beal was, and how his West Midland Railway wasn’t the real one. I know John Ahern created the Madder Valley, that Barry Norman doesn’t mean the film critic, and that Cyril Freezer has had his day. I know that dyed sawdust is a thing of a past, and I’ve admired Copenhagen Fields. I know the theory. I’m just no good at putting it into practice.

Like any skill, though, this is a classic chicken and egg situation. I’m just no good at putting it into practice, because I don’t try.

The answer to that, of course, is to just pick something and start. And nowadays, model railways have come on a long way from where they were when I was a small girl. There’s so much more that is either available to buy off the shelf, or has been at some point and can be found on the second-hand market. You just have to be judicious what you choose to build. If you want to model something from after 1950 or so, it’s much easier than something before around 1925, just because the amount of diversity in the railway network dropped dramatically following the creation of British Railways and the National Coal Board.

That means that building a model of, say, the Brecon & Merthyr Railway in 1905, would be difficult for a practical beginner, even though it would be incredibly interesting and different to most of the model railways out there. A model of the Brecon & Merthyr fifty years later, though, would be relatively straightforward. A few obscure local locomotives were still around, but most were fairly common Great Western and British Railways types. All the obscure little 4-wheel coaches the line had in 1905 had been scrapped and replaced with ordinary GWR ones; all the colliery-owned coal wagons with hand-painted lettering had been replaced with plain grey British Railways 16 ton ones.

With that in mind… I’ve bought myself a treat. I’ve bought myself a regular train set with a few extra bits and pieces, so I have enough there and then to at least get something moving and give me the inspiration to build more. Let’s see where it goes from here!

Update: To see where it did go from here, read the next episode in this saga!

So this is the new year

In which we reflect on the past and the future

Welcome, 2026!

I opened up the blog to post that, and suddenly realised that, well, it’s nearly a year since the last blog post. Every few weeks I’ve opened up an editor, and pondered writing something from the to-do list, but something else has always come up. And so, the archives menu has no entries between January 2025 and January 2026.

That’s partly, to be honest, because 2025 was such a big year for me. It had its ups and it had its downs, but more than anything, it was busy. I felt I was constantly on the road. Days when I was in Leeds for a work meeting in the morning, but had to leave mid-afternoon for a medical appointment multiple hours away. I barely spent a single weekend in my own house.

It was all for good reasons though. It wasn’t just work or medical things. There were trips to museums; trips to pick lavendar; trips to meet internet friends; trips to visit my partner’s family; trips to ride behind steam trains; trips to go swimming in the sea. The main problem, in fact, was knowing how to fit in everything we wanted to do.

I said “partner” there, didn’t I. I haven’t really mentioned relationships on this blog for a few years, I don’t think. At the start of last year, though, I’d just met someone new, someone who went from “internet friend” to “lover” to “life partner” within the space of a year. In the middle of the year she moved house, and by the end of the year we were getting joint Christmas cards from her family. We spend most of our (non-work) time together, largely playing board games.

Close-up of the corner of a board game board, on a dark table.  There are small coloured wooden cubes in two zigzag lines, one red and one yellow.  The yellow line is longer and turns into a vertical stack of cubes at the end.  A board game fan might recognise it as the game Clank! at or very near the end, after the yellow player has died.

I’ve been introducing R to trains and my favourite board games; she’s been introducing me to her hobbies and her favourite board games, and I wish I could put into words more about just how amazing she is. The future is bright; but even busier than before.

Still, I do want to try to post more often on this site again, in between going to work, sorting out the rest of all my inherited junk, holding board game nights with our friends, and everything else that goes along with both having a partner, and having kids with an ex. There is, after all, a long long list of things I’ve been planning to write, some of them lurking on the list for years. There are going to be lots of new ideas too, I’m sure. I can’t promise it will work, I can’t promise I’ll keep writing, but I do want to keep trying to write.

So, this is the new year. Hello 2026. And to the blog: welcome back!

Keyboard news

In which Caitlin buys more keyboards and bits, but not too many more

A few months ago, I wrote about my first exploration into the world of mechanical keyboards, and said, at the time, “am I going to turn into a keyboard nerd?” At that point, I’d found that mechanical keyboards can be extremely practical, that I found them much, much easier to type on than a cheap stock keyboard; but I was very wary of how keyboard nerdery can turn into something expensive and all-consuming. Frankly, I already have too many expensive and all-consuming hobbies. So. Did I succumb?

Well… sort of. It hasn’t become all-consuming, at least not yet. This, though, is how my desk looks now. Yes, that is another keyboard.

Two mechanical keyboards on my desk, one white and pink and the other black and purple

This is a slightly fake photo, I have to admit, because I’d never use both at once. The bottom one in the photo is the Keychron K10 chassis I wrote about previously, but with a prettier set of keycaps. The black pudding keycaps I bought were fine as a first set, but they weren’t really pretty. Moreover, the switches I’d fitted don’t really let enough light through for the translucent part of the pudding to work as expected. The shine-through colours were quite dim, only really visible in a darkened room. Because of this, the keycaps have been replaced by something prettier, a purple gradient set with blank tops.

Above is the new keyboard, a Royal Kludge 65% model in a pink and white colourway, with slightly less key travel. The reason they don’t normally come out together is: this is my new “travel keyboard”, small enough to fit into my work backpack alongside my laptop. It’s wired only, so I bought a matching pink cable to go with. It’s not too loud for office use, but it’s definitely eye-catching; so far I’ve hardly had a single office trip without at least one person asking me where I got it.

“Now hang on there cutie,” I can hear you saying, “didn’t you already talk about a smaller keyboard in your last keyboard post?” Well yes, I did. But as I said at the time, that keyboard is a 60% model. This one is a 65%, and that extra five percent makes all the difference. It means this one has dedicated cursor keys, rather than have the cursor functions doubled-up. In other words, I can code without chording. It makes my life much easier. Moreover, this one is lighter and less bulky in the backpack, due to the lower travel, and is slightly quieter and less annoying to colleagues. It’s also deliberately intended to go with a new-to-me laptop I’ve been playing with, a small pink model that used to belong to The Child Who Likes Fairies, which I’ve wiped and put Gentoo Linux on, so that I can use it as a small, lightweight laptop to use if I’m ever going to be forced to use a small, lightweight laptop for any period of time—in bed recuperating from anything medical, for example. I wasn’t completely sure how well Bluetooth would be likely to work with Linux on a random laptop, which is the main reason I plumped for a wired-only model.

Are there going to be more keyboard developments. Well… maybe. The blank top keycaps on the Keychron do have shine-through legends on the key fronts, which are a bit ineffective in the same way as the pudding keycaps were. The “clicky” switch I still have on the Insert key is a transparent-body switch, by pure chance—I found it in a friend’s spares box—and I can see what a big difference that makes to the shinethrough effect. Because of that, a set of transparent-body red switches and a keyboard rebuild might be on the horizon at some point; there’s no rush, though. Aside from that, though, I do have enough keyboards now, including keeping that first one as a spare. If I find myself tempted to buy more, I really should just sit on my hands.

Crossing things off (part two)

What, continuing with a craft project instead of starting a new one?

For once, I have managed to continue on with the ongoing craft projects without starting any new ones for, ooh, must be nearly a couple of months now. Most of the crafting time has been devoted to the cross-stitch project I mentioned back in July. Despite a break for my holiday—because it’s too large to go in the luggage—I’ve got on quite a way with it. Here’s the progress to date.

Progress on the new cross stitch project

It’s quite hard to take a decent photograph of, because that black background greatly confuses any camera which attempts any degree of automation. Maybe I should try telling them to use Night Mode.

Video killed the documentation star

Despite its popularity, video is really not the best way for a lot of people to learn things

Recently I added Aria Salvatrice to the list of links over in the menu, because I’m always looking to find new interesting regular reads, especially ones that use old-fashioned blogging. In this case, I found myself reading one of its posts which I absolutely found myself nodding along to. It was: Video Tutorials Considered Harmful, about how videos are a much worse venue for learning a technical topic than written documentation.

In general, I agree wholeheartedly with this, with an exception that I’ll come to below. Aria gets to what I think is the nub of the problem: that for some people, with some forms of neurodiversity, it’s really, really hard to focus on the video enough to take it in properly and digest it, and far too easy to get distracted. Your mind just wanders off, in a way that doesn’t happen—or at least not as much—if you’re reading a written text. All of a sudden, you realise that your head has been completely elsewhere for the last five minutes, and you have no idea what you’re watching any more.

What I find strange about this in the tech world, though, is that neurodiversity is hardly rare among software developers and similar professions. This is definitely something that has come up with my current colleagues more than once: the fact that a good proportion of us have this same problem: if we start watching an explanatory video, our minds wander off. All of a sudden, we’ve missed a huge chunk of everything and have no idea where we are. If this is so common among tech practitioners, why are these types of video common in the tech world?

The Plain People of the Internet: But don’t you yourself there have your own YouTube channel?

Yes, I do, but I don’t use it to try to teach you things. Not technical things, at any rate. They are turned into text and posted here, or wherever is most relevant. I don’t create videos of myself lecturing to camera.

That brings me onto another aspect of this, though: the difference between good and bad videos, and how bad videos make things ten times worse. Now, I haven’t posted anything on YouTube for quite a long time, but that’s largely because of the effort involved in making a video that I think is good enough to put out there. In short: I edit. I don’t just live-record a video of me doing something, chat as I go along and upload it; instead I edit. I cut it down, I write a narration, I record and edit that and stitch the whole thing together so that a project that took me several days in real life becomes a ten-minute video. In the sort of tech videos I’m talking about, this often doesn’t happen. Aria writes about this in its original post:

[M]ost video is entirely improvised, and almost never cut to remove wasted time. People’s thoughts meander. Their explanations take five sentences to convey what a single one could have said with more clarity. They wait on software to load, and make you wait along. They perform a repetitive task six times, and make you watch it six times, they perform a repetitive task six times, and make you watch it six times, they perform a repetitive task six times, and make you watch it six times […] And while it is easy to skip repetitive text, it is difficult to know where to skip ahead in a video.

Because, actually editing that down, writing a script, making it concise and informative is itself a skill, a hard one to learn. It’s difficult work. Much easier to just video a stream-of-consciousness ramble and push the whole thing up to the Internet unedited. And that’s why people do it: it’s similarly easier than writing good documentation. Knowing how to explain something you know well, to someone who knows little about it, is also a surprisingly difficult skill that a lot of people don’t even realise they don’t have.

This doesn’t necessarily apply with videos demonstrating physical things that are much harder to describe than to show, by they way. Crafting tutorials, for example, such as How To Crochet A Magic Ring. Even in that case, though, the good ones are carefully edited, brief, clear and concise.

In short, what I’m saying is that video has taken over (to some extent) from written documentation because if you’re willing to accept low quality, it’s much easier to produce, even if the results are worthless. It’s inevitably lower-quality, though, because of all the flaws in the format mentioned in Aria’s piece, such as lack of searchability. It’s accidentally low quality because if the creators put the effort in to make it good, it would take as much or more effort than writing good textual documentation takes. Those flaws can be fixed by putting the effort in and learning to skills to make a good video; but the inherent flaws of the format can’t be changed. Better all round to produce written documentation from the start.

Crossing things off

Finish craft projects? Nah. Start new ones? Yes please

There are still numerous craft projects somewhere in mid-flight at Symbolic Towers, and I keep slowly gathering plans for more that I haven’t even started yet. I have enough crochet patterns to keep me crocheting for several years, probably; a very large cross-stitch under way, and several other cross-stitch kits ready to start—and that’s to say nothing of the Lego or the model train kits. None of these things, really, have been posted on here, largely because I think “I’ll save them for YouTube” and then never video them either.

Despite all that, I’ve just started yet another cross stitch project!

What’s exciting about this project, the reason why it’s using up most of my crafting energy at the moment, is that: for the first time, this isn’t a kit. It’s not even a pattern I’ve bought and then found my own materials for, like most of the crochet projects. No, for the first time, this is a pattern I created myself. I saw something I thought would make a good cross stitch project, turned it (with the help of software) into a chart, and got started.

The start of a new cross stitch project

Because this isn’t something that was designed specifically for cross stitch by a specialist cross stitch designer, it does use quite a lot of colours, and it’s going to be a bit more complex than pretty much all of the cross stitch kits I’ve tried so far. Because of that, for the first time, I’ve actually started crossing off each of the stitches on the pattern as I do it—it helps that I know I can always print another copy off, of course. It is definitely going to help the further into this I get, though, especially when I get to the parts of the design which include lots of small areas of different colours, or the parts with lots of confetti—the cross stitch term for single isolated stitches scattered one-at-a-time across the background. This project will have a lot of confetti.

Crossing things off as I go

It will be some months before the whole thing is finished, even though it’s not full coverage, and even if I did deliberately avoid including any backstitch as part of the design. For now, though, new project energy is carrying me bowling along at pace. Only a week in, and already I’ve done a good chunk of the pattern’s central, focal point.

Progress, as of yesterday

That’s quite a good chunk of stitching for one week’s spare evening moments. What is it, you ask? Well, to know that…if you don’t recognise it, you’ll just have to wait and find out.

To read the next post about this project, follow this link

Refactoring

Or, making the site more efficient

Back in March, I wrote about making my post publishing process on this blog a bit simpler. Well; that was really just a side effect. The main point of that post, and the process behind it, was to find a simple and cheap way to move this site onto HTTPS-based hosting, which I accomplished with an Azure Static Web App. The side effect was that the official way to deploy an Azure Static Web App is via Microsoft Oryx, run from a GitHub Action. So now, when I write a new post, I have a fairly ordinary workflow similar to what I’d use (and do use!) in a multi-developer team. I create my changes in a Git branch, create a GitHub pull request, merge that pull request, and the act of doing a merge kicks off a GitHub Action pipeline that fires up Oryx, runs Wintersmith, and produces a site image which Oryx then uploads to Azure. Don’t be scared of all the different names of all the steps: for me, it’s just a couple of buttons that sets off a whole Heath Robinson chain of events. If I was doing this in a multi-person team, the only real difference would be to get someone else to review the change before I merge it, just to make sure I haven’t said something completely stupid.

You, on the other hand, are getting me unfiltered.

I mentioned in that previous post that Oryx would often give me a very vague Failure during content distribution error if the content distribution step—the step that actually uploads the finished site to Azure—hit a five-minute timeout. I tried to address this, at least partially, by cutting the size and number of the tag pages; and it did address it, partially. Not all of the time though. After an evening of trying to deploy a new post for an hour or so, hitting the timeout each time and trying again, I decided I had to come up with a better approach. What I came up with, again, has another rather nice side effect.

A little bit of digging around what other people facing the Failure during content distribution error had written, unearthed a useful tidbit of info. That timeout doesn’t just happen when the site is large in size. It also is more likely to happen when an upload contains a lot of changes.

Now, every page on this site has a whole bunch of menus. If you’re on desktop, they’re over to your right; if you’re on mobile, they’re down at the bottom of the page somewhere. There’s articles filed by category and articles filed by date. There’s the cloud of all the tags I’ve used the most, and there’s links to other sites—I really should give that a refresh. Those blocks are on every page. The ones which link to other pages include a count of articles in that category or month, so you know what you’re letting yourself in for. The tag cloud’s contents shift about occasionally, depending on what I’ve written. The end result is that, when I was adding a new post to the site, every single page already on the blog had to be rewritten. For example, this is the first (and only) post from May 2024, so every single page already on the site (all 4,706 of them), had to be rewritten to add a “May 2024 (1)” line at the top of the “Previously…” section. That’s about 84% of the files on the blog, changing, to add one new post.

However…it doesn’t have to be like that.

The whole site doesn’t have to be completely static. It can still remain server-side static, if you’re willing to rely on a bit of client-side JavaScript; most people, the vast majority of people, have JavaScript available. Instead of including those menus in every page, I thought, why not render those menus once, and have a wee piece of JavaScript on each page that pulls in those blocks on demand?

It wasn’t that hard to do. Rendering the files just needed me to pull those blocks out of the main layout template and into their own files. The JavaScript code to load them is all of 11 lines long, and that’s if you write it neatly; it really just initiates a HTTP GET call and when the results come back, inserts them onto the right place on the page. There’s a sensible fallback option that lets you click through to a truly-static version of each menu, just in case you’re having problems—those largely already existed, but weren’t really being used. Now, adding one new post needs, at the moment, just over a hundred files to change. Most of those are the hundred-ish files that make up the “main sequence” of posts, as when you add one at the top, another drops off the bottom and on to the next page, and so on all the way down. There are also the affected category and month pages. Even so, you’re going from changing ~84% of the pages on the site, to changing somewhere around 2-5%. That’s a massive difference. It also reduces the size of the site quite a lot too: those menus are over 12kb of code, all together. Not very much by modern standards, just once; but repeated on every page of the site, that was using up about 58Mb of space which has now been clawed back.

Naturally, the first deployment of the new system took a few goes to work, because it was still changing every page on the site. Since, though, deployments have gone completely smoothly, and the problem hasn’t come back once. Hopefully, things will stay that way.

This isn’t the only improvement I’ve been working on, by the way. There is, upcoming, another big change to how the site is published. It isn’t quite ready to go live yet, though. I’ll be blogging about it when it reaches production, when I find enough free time to get it finished. It’s something I’m really pleased with, even though if I didn’t tell you, you wouldn’t actually notice a thing. You’ll just have to wait for the next meta-blog post about engineering on the site, to find out what I’m working on.

Update, February 2026: The development I was talking about in the last paragraph has now been released. It’s Iceforge, my own static site generator, which has been used to build this site for around 18 months now.

Typecasting

In which Caitlin is at risk of acquiring a new hobby

One stereotypical nerd gadget I’ve never seen the point of, that I always assumed was the nerd equivalent of hand-woven gold hi fi cables, was the mechanical keyboard. I assumed they were, as the phrase goes, fidget spinners for IT geeks. Something that is expensive and makes lots of fun clicky-clacky noises, but doesn’t actually change your computing experience by one tiny bit.

Well, reader, I was wrong. I admit it. Completely, absolutely, 100 per cent wrong. Switching to a mechanical keyboard has been one of the best productivity improvements I could have made to my workplace. Since I started using one, my typing has speeded up enormously. It’s definitely not just a toy. Having a decent length of travel on each key movement somehow genuinely makes it much easier and quicker for me to type; and also makes my typing a lot more confident. I’ve never learned to type properly, and I still make a lot of mistakes, but in general I’m finding my fingers skip across the keys much more freely.

This first started last summer when I was already tempted by the idea, and saw that a fairly cheap model already had been reduced quite a lot on sale. So, I bought it. And, if nothing else, it was pretty. It glowed, with rainbow light. It came with a choice of beige or purple keycaps, so being contrary I naturally changed just half of them over, trying to get a dithering kind of effect from beige on the left to purple on the right. It kind of worked. Typing, though, was excellent.

The mixed keycaps of my first mechanical keyboard, with shine-through legends on the keys

I felt like I was typing much better than I ever had on laptop keyboards, but there was something wrong. Still, I resisted the temptation to be a keyboard nerd. An enthusiast. One keyboard would be enough for me.

The problem with the first keyboard was that it was only a 60% model. In other words, it only has about 60% of the keys of a “full” PC keyboard; just the core letters and numbers really. To get all the other functions, you need a modifier key. A lot of laptops do that to access extra functions or squeeze all of the keys into a laptop case, but this was using it for fairly basic functionality like the four cursor keys. When coding, I find myself moving around with them a lot, so having to chord to use them quickly became annoying. On top of that there were other little problems: the Bluetooth connection would sometimes glitch out, particularly if the battery was low. When the battery ran low the only warning was one of the modifier keys flashing, and then when you charged it up there was no sign of how charged it was. On the good side, its small size made it nice and portable. Overall, it was a good starter.

After a few months, I’d decided it was time to think about buying a full-size mechanical keyboard. And why not go all in and just buy a “barebones” model. A barebones keyboard is, well, not really a keyboard at all. It’s the core of a keyboard, but it doesn’t have any keys. You have to fit it out with keyswitches and keycaps for it to work. When it arrived, it was very nicely-packaged, it felt very substantial, solid and heavy, but I couldn’t actually start using it.

The new barebones keyboard, a Keychron K10, without any switches or keycaps

It’s a Keychron K10 model, and all you have to do to get it working is push switches into each of those sockets. You get to choose the brand of keyswitch you want, though, and switch manufacturers publish complex charts of the response and movement of different types of switch, describing them as “soft”, “firm”, “clicky” and so on. I just went for a fairly soft switch from a well-known brand, and set to work plugging them all in. It was quite a therapeutic job, pushing each switch home until it is firmly in place.

Plugging switches into the keyboard.  If I'd been planning to blog about this I'd have done my nails first

All the switch sockets nicely filled in

The harder part is choosing the keycaps: harder, because as well as how they feel, they have to look pretty too, and there are an innumerable assortment of manufacturers who will sell you pretty keys. And in the end, I just couldn’t decide, so went with a set of plain black “pudding” keycaps. “Pudding” keycaps have a solid, opaque top but translucent sides, so the backlights on each key shine nicely through. I’m not sure they are the right keycaps for me long-term, but they were a nice and cheap “first set”.

The finished keyboard with pudding keycaps

Am I going to turn into a keyboard nerd? Well, I’ve already tweaked it a wee bit. I kept hitting the “Insert” key by accident, not being used to having a key there, so I’ve already changed the switch on that specific key to be a much firmer, clickier one, so that at least when I do hit it by accident I notice I’ve done it. I’ll probably change the keycaps for something prettier at some point, something a bit more distinctive. I’m not going to go out and buy a lot more keyboards, because I already think this one is very nice to type on. It has a sensible, useful power lamp that flashes when the battery’s low, is red when it’s charging and goes green when it’s finished. But, overall: I admit I was wrong. This is much, much nicer to type on—I’m writing this post on it now—than a standard laptop keyboard is. For something I’ll use pretty much every day that I’m at home, it’s definitely worth the money.